From idea to published post: a workflow using Jekyll
Every Monday, I publish a new blog post here. I have a few posts I’m working on at once at the moment – but I thought I’d take a week out from them to write about how I manage these posts while working on them. This will be particularly useful if you use Jekyll yourself but may also be of interest if you’re into writing and editing. I’ll explain some code I wrote this week to help my writing.
Jekyll revisited
Back at the end of March, I restarted my blog with Jekyll. I wrote a post to mark the occasion of this blog’s relaunch and since then have been publishing a post once a week.
Jekyll makes writing a blog easy. You simply write a Markdown file, with some properties like the date and title, at the top. Markdown is easy to master and the properties you need at the top for Jekyll’s purposes are called “YAML front-matter” and again are very easy to learn. You can read Jekyll’s own page on how it uses YAML to find out more.
I host my blog on GitHub Pages, which automatically takes care of hosting my files and turning them into static webpages for me. But because I’m using GitHub I became interested, as ever, in the possibilities of versioning my blog and tracking my writing.
Drafts folder
Shortly after relaunching my blog I discovered that Jekyll allows for a _drafts folder.
Just as it’s possible to view your main posts locally, by using jekyll serve before you push them to GitHub, it’s also possible to see everything in the _drafts folder alongside your already published posts by using jekyll serve --draft. A help page about drafts on the Jekyll site explains this.
I started using this feature almost straight away. But I quickly hit a problem. I didn’t want to commit my drafts, many of which are half-finished posts, to a GitHub repository that might be public. I wanted a place to jot down ideas and develop them gradually into posts before anyone could see them.
So I added _drafts to my .gitignore file to ensure they would be passed over by Git. But this left another problem. If everything that wasn’t published wasn’t in my repository, how could I work on my drafts remotely?
Private repo
I decided to use the fairly simple idea of making the _drafts folder within my local Jekyll repository a repo in its own right.
When I take the terminal into the _drafts folder and run git status instead of seeing the status of my overall blog, I see only the status of draft posts.
And I have set up Atom to see the _drafts folder as a separate project area, even though on my file system it sits within my GitHub pages repository.
And I push commits within that folder to a private GitHub repository. (I pay $7 a month for my GitHub account so that I have use of unlimited private repositories.)
Thinking in this way has enabled me to think about my _drafts repo as having its own workflow.
Writing workflow
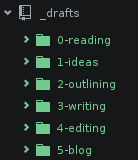
I have five main sub-folders within _drafts as part of the workflow:
- Ideas
- Outlining
- Writing
- Editing
- Blog
I also have a “zeroth” folder called reading, which I use for capturing notes while I am studying something. I’ll explain how that works in another post perhaps.
1. Ideas
Whenever I have an idea for a post, I create a Markdown file for it. There might be nothing in the file to begin with but the name of the file can serve as a reminder of something I want to write about.
Some ideas haven’t got beyond this “empty file” stage but, if and as I develop an idea, I eventually start to think about how I might structure it as a post.
2. Outlining
As the ideas develops, I start creating headers in my Markdown file. The headers act as the main points I might want to cover in the post. This gives me an indication as to whether my idea is actually one post or several.
It also means I’m thinking about the structure from the outset – what am I trying to say and what are the key parts of what I’m trying to say.
Not to get too “meta” about this but you can see this in action in this post. The headers existed before this text did, although I might later adapt headers to fit what I’ve written.
3. Writing
By the time I’ve created my headers I’ve already been thinking about what I want to write. I’m even excited about it; I can see the post already taking shape! In my enthusiasm, I have sometimes even already placed in some draft paragraphs or notes between headers, which I’ll then seek to elaborate.
Once I’m doing this, I tend to move my file from the 2-outlining folder to the 3-writing folder.
One doesn’t necessarily want the process of editing to get in the way of getting the initial thoughts and feelings flowing. I find it more effective to write a first draft, get it all out into the structure I’ve outlined, and come back to it later to review if there’s time.
4. Editing
I try and leave time between writing the first draft of a post and then editing it. So once I’ve written the first draft, I’ll move it from the 3-writing folder to the 4-editing folder where it will, in theory, sit for a bit. I can then drop in to that folder when I’m in an editing mood and when I’ve sufficient time and distance from the original writing session.
It doesn’t always happen like that – sometimes I will edit as I write. But I always feel less productive when I do so. I try to encourage a good habit of keeping the two activities of writing and editing separate by recognising them as such in my workflow.
5. Blog
When I’m happy with the post (or as happy as I can be within my self-imposed deadline), I’ll then look at publishing it. The first part of this is moving the post to the blog folder. I call it blog rather than 5-blog for the same reason I have a folder simply called images; I want links to other posts in my blog to work whether I’m in draft or in the live blog. And in my live blog, all my posts use /blog/ in their pathname.
At this point, when I’m moving things into the blog folder, I also include the date and time details in the filename. So this post, whose filename is workflow-for-jekyll.md as I write on my first draft becomes 201606131900-workflow-for-jekyll.md in the blog folder to mark the date and time I want it to be published.
Publishing my post
Of course when publishing my post, I want to copy it to the _posts folder where it will be committed to my main Jekyll repository and appear on the live site.
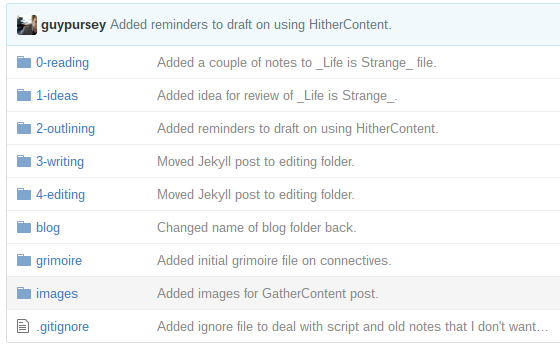
But I still want a copy in my _drafts/blog folder because I may need to do further editing in future and I want to, again, do that separately from the live site.
Automating boring bits
So now I have a script that does this work for me.
Until last week, I was manually taking all these steps – moving my finished post to _drafts/blog, giving it a date and time stamp, then copying it to _posts but also renaming it there… Don’t forget that Jekyll requires the filename of posts to be a certain format – like 2016-06-13-1900-workflow-for-jekyll.md. (The timestamp is not actually needed but I prefer to keep it.) And Jekyll requires that YAML front-matter, namely:
---
title: "Workflow for Jekyll"
date: 2016-06-13 19:00
---
It was only a matter of time before got too tired or lazy to go through the same process every week, particularly as something like this is so easily automated.
“Post” script
If you like the sound of my workflow and want to adopt it for your own writing and blogging, this script might be helpful.
My script basically assumes that I’ve done the work of putting the file in the _drafts/blog folder already. At that point I run my script from my GitHub pages repository, by simply typing ./post.sh followed by the name of the file I want to publish:
./post.sh 201606131900-workflow-for-jekyll.md
My script checks the file exists, checks it has a valid date and time string – basically, just looks for a string of 12 numbers in a row – and then copies to _posts, renames it, and adds the YAML front-matter at the same time. To get the title of the post, it simply strips out the first H1 it finds, removes it from the file and replaces it with the YAML.
This is all pretty basic stuff and achieved in 42 lines (if you include comments and line-spacings) of BASH script. I’ve added the script on GistHub for convenience.
At the end it returns to the console a short-form Git status update showing all the modified files in my GitHub pages repository. This way I can commit several changes at once, which is useful if I’m not just publishing a new post but also correcting some old posts.
For the post to actually go live, I still have to commit it to the repository and push it to the remote repository on GitHub itself.
What next?
Because I still have to duplicate effort in some places – for example, commiting changes to my _drafts repository and to the overall GitHub pages repository, I can see the potential for other scripts around this one. I could do with writing code for handling images, for checking broken links, even for automating tags and categories.
I’d like to explore doing some of these things with Ruby, the language Jekyll uses, rather than BASH which I used here as a quick and dirty method to see the results. Automation-wise, there’s much more I could be doing to save myself time – when I have time.
But writing-wise, I think there’s more to say about my approach to reading and coming up with ideas for posts, as well as the sorts of things I’d like to achieve which would be unique to writing for a blog rather than any kind of writing, which I think my current workflow serves just as well.